Porch CeilingsLooking Great and Maintenance FreePorch ceilings can be a maintenance issue if you select the wrong material or if they are not installed properly. Wood ceilings, whether they be plywood or tongue and groove will require care over time.Consider a vinyl ceiling for your porch if you don't want to spend time maintaining it. Bead board ceilings look great too! 
When installing your porch ceiling, pay attention to the details to ensure a longer lifeSee how Shelly, one of our kind readers from Connecticut, transformed her ceiling from the ordinary to the extraordinary. She used vinyl bead board panels along with meticulous craftsmanship to create a long lasting, virtually maintenance free porch ceiling.Shelly writes: "I got hanging baskets for Mother's Day and decided that we should do something about the yucky vinyl ceiling the builder put in 3 years ago before putting holes in for plant hooks. Well, it turned into a complete renovation!" 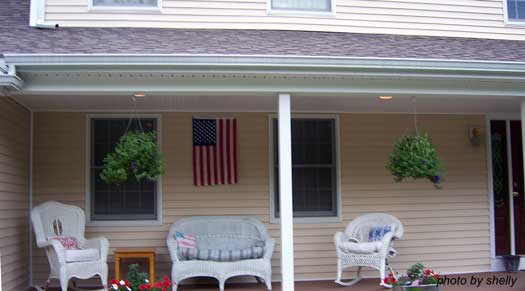
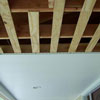
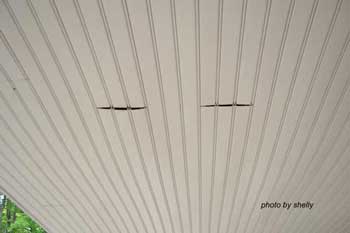
The vinyl had been installed the length of the porch without furring strips for support and the nailing flanges were broken which caused the ceiling to sag and open the butt joints all along the length of the vinyl. 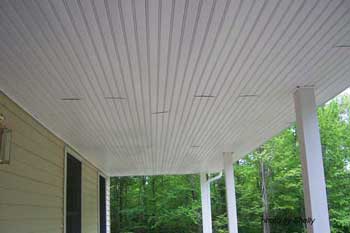
"Shelly decided that since only about half the material could be salvaged to run the short way, she'd buy new material (Certainteed Triple-2 ® beaded soffit). Porch Ceilings Installation Process and TipsTo have the least waste out of the 12.5 ft lengths and add some visual interest, she decided to box in the existing carrying beam and run the T2 beaded soffit to that, then put vented soffit to match the rest of the house on the overhang.She chose Kleer PVC for the beam as it comes in 18-ft lengths and again would have little waste over the 48-foot long run. 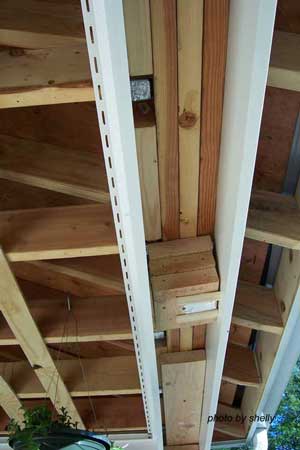
With the help of contractor Eric of Great Room Construction in Canton CT, she pulled down the old ceiling. They found there was a 1 5/8" sag at one end of the porch and Eric spent a good part of two days leveling the joists. This attention to detail ensures the ceiling will look fantastic for years to come. Sheets of 7/16 plywood were ripped into strips and nailed to the joists. This provides a nailing surface for the 6" wide T2 material in between the 16" on-center joists. Eric then boxed out for recessed ceiling lights. 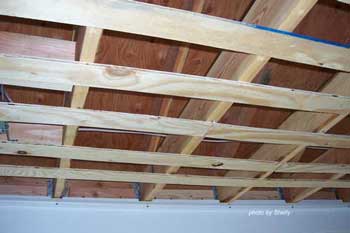
The siding at the garage end of the porch was removed and a new corner was installed in place of the J channel the builder had used on the inside corner. 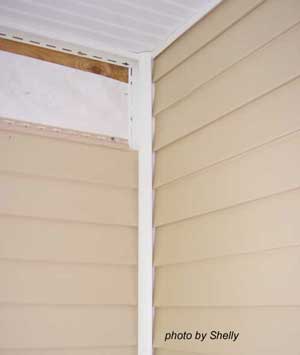
They boxed in the beam using 1x8 Kleer PVC and 2" coated exterior screws (predrilled the Kleer to countersink the screws). They pulled the vinyl J-channel that had supported the old ceiling off the railing end of the porch and built a false beam to match the front beam. A J-channel was added all along the new beams, level with the J-channel at the top of the siding. 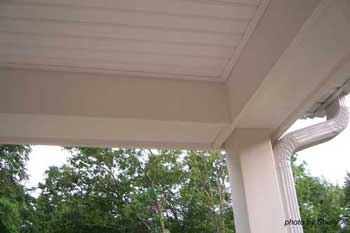
While Eric worked on the overhang, Shelly began installing the beadboard ceiling which was cut to fit since they weren't all exactly 75" long front to back. 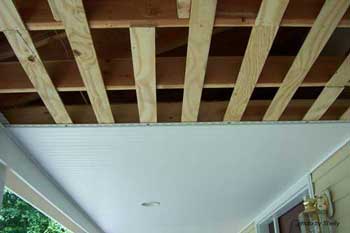
Screwing them in rather than nailing them allowed Shelly to adjust the screws to level the material out so that it fit in the J-channel at the house and at the new J-channel on the beam without gapping. It took two days to install almost 48 ft (96 pieces) of bead board! 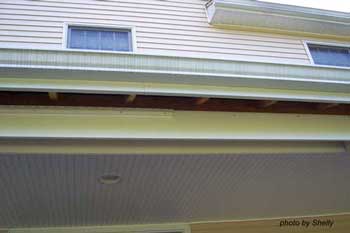
Blocking was installed on the underside of the carrying beam. This was strategically located for Shelly's plant hangers (can't forget how this whole project started!) and also allowed for nailing surfaces for the Kleer trim boards that form the underside of the beam. Because the original (triple 2x6) carrying beam had rolled, the blocking had to be shimmed in a few places. 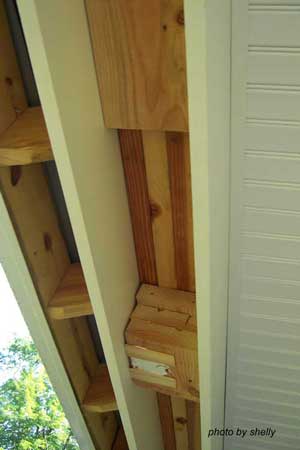

The last three Kleer boards were cut and ripped to fit between the columns and at the end of the porch, and with a little help were wedged in between the vertical trim boards. They checked for the proper reveal before nailing them into the blocking with finish nails. J-channel was installed around the ends of the beams and the siding was reinstalled. A small piece of PVC on the underside was added because of the reveal. 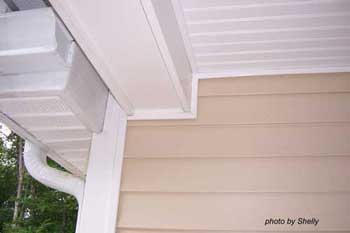
"The underside was run from column to column, so Eric had to cut small pieces of PVC to fit in front of and behind each of the five columns. Some attention to detail! 
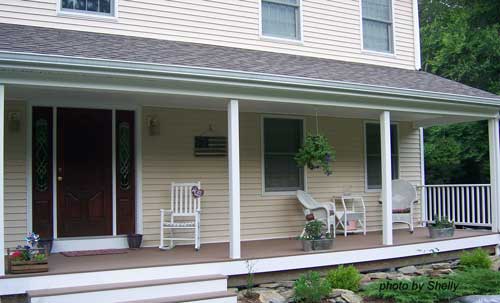
Here's the New Ceiling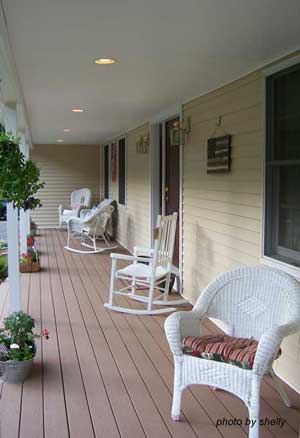
Shelly writes: "Please don't laugh at my poor plants - they had a rough time of it, first in the garage, then hanging in the rafters
of the porch as we worked around them.
I'm still working on the landscaping - and rebuilding the stone walls under the porch that I tore out to put hardware cloth in (another project)". 
No laughing here, Shelly. Your porch and porch ceiling look wonderful and we hope you take time to enjoy them. Our many thanks to you for sharing your ceiling transformation project with us; we know our site visitors will learn a lot and hopefully be inspired to tackle such a project themselves! Shelly's porch was also featured in Home Construction Improvement, a site rich with numerous articles about popular home improvement, home construction and home renovation topics. You will enjoy their Home Improvement Articles offering tips to get the best results from your home improvement project.  This project could not have been completed so well if it weren't for Eric of Great Room Construction,
765 Cherry Brook Rd. Canton, CT 06059
This project could not have been completed so well if it weren't for Eric of Great Room Construction,
765 Cherry Brook Rd. Canton, CT 06059
Don't forget to view our other porch ceiling information detailing types of porches and tips for installation! Here are the first pictures of Shelly's vinyl bead board ceiling that she shared with us.

Hi! We're Mary and Dave, lifelong DIYers, high school sweethearts, and we both love porches. You've come to the right place for thousands of porch ideas. Our Sponsors


End Sponsors Helpful LinksEnjoy shopping Amazon (affiliate link)Popular PagesWhat's NewJoin Our Newsletter Family Porch Designs Porch Ideas for Mobile Homes Find a Local Contractor Build a Porch | Small Porches Porch Columns | Porch Railings Screened Porches Porch Curtains | Porch Enclosures Porch Landscaping | Vinyl Lattice Porch Decorating | Porch Ideas Shop Navigation AidsHome | Top of PageSite Search | Site Map Contact Us PoliciesDisclosure Policy | Privacy PolicyLegal Info Please Join Us Here Also
Find a Trusted Local Pro Copyright© 2008-2024 Front-Porch-Ideas-and-More.com All rights reserved. No content or photos may be reused or reproduced in any way without our express written permission. At no extra cost to you, we earn a commission by referring you to some products on merchant sites. See our disclosure policy. We, Front Porch Ideas and More, confirm, as stated on our privacy policy, that we do not sell personal information. All content here is solely for presenting ideas. We recommend consulting with a licensed, experienced contractor before you begin your project. We make no guarantees of accuracy or completeness of information on our site or any links to other websites contained here. Thank you for taking your time to stop by. See what's popular and new here. |
Hi! We're Mary and Dave, lifelong DIYers, high school sweethearts, and we both love porches. You've come to the right place for thousands of porch ideas. --- Our Sponsors ---
--- End Sponsors ---Find Top-Rated Service Pros
Our Newsletter, Front Porch AppealLearn more!Thank you for being here! |
||||
|
At no extra cost to you, we earn a commission by referring you to some products on merchant sites. See our disclosure policy.
We, Front Porch Ideas and More, confirm, as stated on our privacy policy, that we do not sell personal information. All content here is solely for presenting ideas. We recommend consulting with a licensed, experienced contractor before you begin your project. We make no guarantees of accuracy or completeness of information on our site or any links to other websites contained here. Front Porch Home | Return to Top Contact Us | About Us | Advertise with Us | Search | Site Map Media | Privacy Policy | Disclosure | Legal Notice | What's New 
|
|||||
|
No content or photos may be reproduced or copied in any way without our express written permission. | |||||