By Dave and Mary

Porch Railings Calculations Made Easier

Baluster Spacing and More

If building your own porch or putting up new railings, the porch railings calculations can make you scratch your head. Let us take some mystery out of that.


Anatomy of Porch Railings

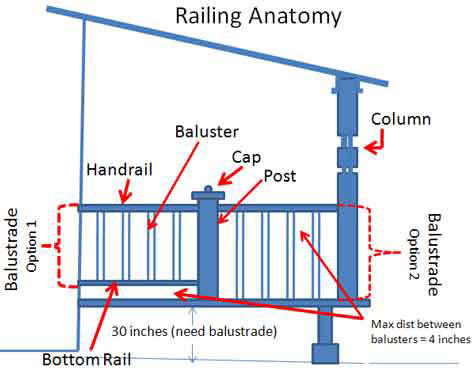
Porch railing anatomy diagram


  • Balusters: sometimes called 'pickets' run vertical between the top hand rail and bottom rail, the porch floor, or steps.
  • Balustrade: this is the combination of the top rail, the balusters, and bottom rail if used.
  • Bottom Rail: this is a horizontal piece (optional) to keep hole balusters in place and is also used for visual effect and for ease of cleaning. This needs to be supported every 36" from the floor.
  • Column: this is a supporting post that normally supports the roof.
  • Handrails: top piece of the balustrade; supports the balusters and provides a hand hold
  • Panels: can be glass or other material; used in lieu of balusters for both aesthetic and to minimize visual obstructions
  • Posts: these are required not usually to exceed every 72" to support the balustrade
Most building codes allow for a maximum gap of four inches between balusters for safety reasons. So, how do you calculate the spacing between balusters so that you don't end up with a gap that is too large?

Try this method for porch railings calculations. It's actually harder to explain it than it is to just do it. So read over it a few times and you'll discover how quickly you'll be able to make the computations!


Porch Railings Calculations

First, determine how many balusters you will need.
  • Add the width of one baluster to the maximum gap that is allowed (usually 4 inches). So, if your baluster is a 2 x 2, you'd add 1.5 inches to 4 inches to get 5.5 inches. (NOTE: Say what? You probably think the width of a 2x2 should be 2" - not 1.5". But remember, lumber measurements are based on the size of the board before it is cut so a 2x2 is actually 1.5 x 1.5 inches.)
  • Measure the distance between the two posts (let's say 68.5 inches - the max distance between posts - refer to diagram below) and divide it by the number you calculated above. So 68.5 divided by 5.5 = 12.45
  • Round up this number. So 12.45 rounded up = 13. This is the number of balusters you will need between the two posts. (How many spaces will there be? 14 spaces as there is always one more space than total number of balusters).


Now that you know you need 13 balusters (and have 14 spaces), it's time to figure the spacing distance between balusters.

To compute the spacing distance between balusters:
  • Measure the width of a baluster. A 2x2 is 1.5 inches.
  • Multiply 1.5 inches times the number of balusters. 1.5 inches x 13 = 19.5 inches
  • Subtract that from the distance between the posts: 68.5 inches - 19.5 inches = 49
  • Divide that by the total number of spaces. So that means 49 divided by 14 (there is always one more space than the total number of balusters). The answer is 3.5.
  • So now you know that the space between your balusters will be 3.5 inches.
  • Make a spacer that 3.5 inches wide. I like to use a scrap piece of 2x4. Tip: I always make at least two and sometimes four spacers. Why? I use one for the bottom and one for the top. I also am always dropping them. Your spacer should never be greater than the maximum allowed size (in this case, 4 inches)
  • There you have it! Like I stated earlier, it's actually easier to do than explain porch railings calculations.


Summary
  • You first determine how many balusters you need for the amount of space you have to fill.
  • Then you determine how much space to allow between balusters. Follow your local building codes.
  • If you have a small amount of variation in the spacing between balusters, it will probably not be noticed. So don't worry.
Be proud of your good work! Just be sure you stay true to the building codes for porch railings calculations. Be sure to refer to our general railing building code requirements below to get a better understanding of what's required.


Dave's Expedient Spacing Guide

Here's an easy way to determine both equal spacing and placement between two fixed points such as porch columns. You can also use this device for many different uses.
  • Purchase an elastic band approximately 1/2 to 1 inch wide by 6 to 8 feet long
  • Lay it on a flat surface and mark it in 2 inch increments
  • To determine both the number of balusters, hole, etc,, attach one end to fixed point
  • Stretch the band to the other fixed point until you reach your desired spacing, i.e., 3.5 inches, 4 inches, etc.
  • Place mark at the locations as indicated on your band.


You may be able to purchase a pre-marked band at your local supply store. I was lucky as Mary had an extra one in her craft room.


Mary and Dave, Founders of Front Porch Ideas and More
Hi! We're Mary and Dave, lifelong DIYers, high school sweethearts, and we both love porches. You've come to the right place for thousands of porch ideas.

Our Sponsors
The Porch Store


Shop for Porch Parts at Vintage Woodworks.


Use the PCA Visualizer to design your screen door

End Sponsors


Helpful Links

Enjoy shopping Amazon (affiliate link)

Popular Pages

What's New

Join Our Newsletter Family

Porch Designs

Porch Ideas for Mobile Homes

Find a Local Contractor

Build a Porch | Small Porches

Porch Columns | Porch Railings

Screened Porches

Porch Curtains | Porch Enclosures

Porch Landscaping | Vinyl Lattice

Porch Decorating | Porch Ideas

Shop

Navigation Aids

Home | Top of Page

Site Search | Site Map

Contact Us

Policies

Disclosure Policy | Privacy Policy

Legal Info


Please Join Us Here Also

Join us on Facebook for porch talk Join us on Pinterest Subscribe to get our updates. Thank you!


Get in touch with pre-screened local professionals for work you need done
Find a Trusted Local Pro


Copyright© 2008-2024
Front-Porch-Ideas-and-More.com All rights reserved.
No content or photos may be reused or reproduced in any way without our express written permission.

At no extra cost to you, we earn a commission by referring you to some products on merchant sites. See our disclosure policy.
We, Front Porch Ideas and More, confirm, as stated on our privacy policy, that we do not sell personal information.

All content here is solely for presenting ideas. We recommend consulting with a licensed, experienced contractor before you begin your project.
We make no guarantees of accuracy or completeness of information on our site or any links to other websites contained here.


Thank you for taking your time to stop by. See what's popular and new here.

small rocking chair


Mary and Dave, Founders of Front Porch Ideas and More
Hi! We're Mary and Dave, lifelong DIYers, high school sweethearts, and we both love porches. You've come to the right place for thousands of porch ideas.
--- Our Sponsors ---
The Porch Store

Use the PCA Visualizer to design your screen door

Shop for Porch Parts at Vintage Woodworks.

--- End Sponsors ---
Find Top-Rated Service Pros
Get in touch with pre-screened local professionals for work you need done

Our Newsletter, Front Porch Appeal
Learn more!


Thank you for being here!


small rocking chair
At no extra cost to you, we earn a commission by referring you to some products on merchant sites. See our disclosure policy.
We, Front Porch Ideas and More, confirm, as stated on our privacy policy, that we do not sell personal information.

All content here is solely for presenting ideas. We recommend consulting with a licensed, experienced contractor before you begin your project.
We make no guarantees of accuracy or completeness of information on our site or any links to other websites contained here.


Front Porch Home | Return to Top
Contact Us | About Us | Advertise with Us | Search | Site Map
Media | Privacy Policy | Disclosure | Legal Notice | What's New

XML RSS   Add to My Yahoo!  
By Mary and Dave Morris, Copyright © 2008-2024 Front-Porch-Ideas-and-More.com. All rights reserved.
No content or photos may be reproduced or copied in any way without our express written permission.


Page copy protected against web site content infringement by Copyscape