Building a Three Season PorchA Great DIY ProjectIf you love screen porches then building a three season porch may give you the best of both worlds. Three season porches (also called sun porches) have evolved to solve the problems of the outdoors.Three season porches enable homeowners to enjoy their porch even with changing weather, seasonal issues and insects. The difference between a sun porch (or three season porch) and a 4-season porch is that a sun room is not insulated, or heated or cooled through mechanical means. 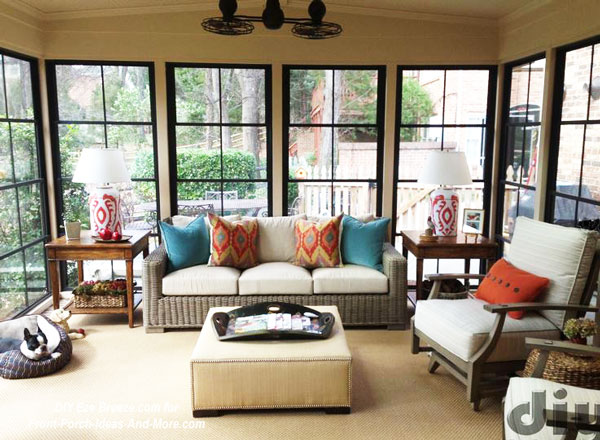

See these screen porch windows courtesy of DIY Eze Breeze.comAdvantages of a 3-Season Porch
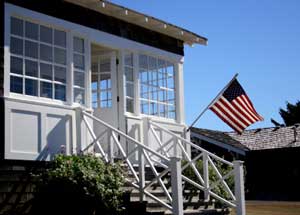
Three season porch with knee wall For the investment, you can't go wrong with building a three season porch! Once you have one, you'll wonder why you didn't do it sooner!
Mary and I used ours extensively. We ate, entertained, relaxed, talked, watched TV, read the newspaper, listened to music, and spent quite a few nights "sleeping" out on our 3 season porch. You can DIY For the DIYer who would like to build a three season porch, here's the good news! It's very doable and not much different than converting your existing porch to a screened porch. Also, sun room kits are also easy to install. If you would rather spend your time doing other things than building a three season porch hiring a contractor is a viable option; costs are minimized because you already have the basic structure in place. I'm assuming you have an existing porch in excellent condition, with roof, columns, flooring,stairs, etc., all in good repair. I can't address every issue for every type porch but will give you the basics that should cover most porch situations.
The following is for the DIYers and DIY wanna-be's, those ingenious souls who like to make some sawdust!
Converting a porch to either a screened porch or sun porch is a great project!
Grab a friend, grab some cold drinks...let's "rip a board" or two! Step 1The same steps apply to building a three season porch as they do for building screen porches. However, because you will be replacing the screens with glass, frame support needs to be more substantial.Look at our guide to screened porch panels to determine which method is best for you. Your screening method will dictate how and what you use for conversion to a 3-season porch. NOTE Use our porch screening materials guide to determine the best screen material for your porch. Although screen material can come in widths of up to 9 feet, I don't recommend a width of over 4 feet as it is very difficult to stretch it properly if wider. Four-foot widths provide more than sufficient viewing area. Step 2Chances are you are not going to have glass from floor to ceiling. So when framing your porch for both screen and glass panels, I recommend you frame for standard sizes to minimize costs.Having glass panels made is relatively cost effective. Either purchase your screen frames or build them to the same size. However, you can also have non-standard glass panels made also which will increase your visual field. Do not make them larger than you can install/remove safely as necessary. OPTION: Instead of glass consider using acrylic panels or acrylic storm panels. Lighter in weight, they are easier to work with and look great. However, they do tend to scratch easily and can break if handled incorrectly. Consider using them as a knee-wall or to replace/cover the screens in colder weather. NOTE: Before planning further, take note as to where you are going to store either the screens or glass panels when not in use! We had to store over 35 glass panels (storm windows)- they do take up space and must be handled carefully! Perhaps you will have storage space beneath your porch (ensure you have easy access). Special NOTE: We had screens permanently installed on the porch. By doing so, we didn't have to store them. The glass panels fit in the same frames and were held in place with twist locks. We only had to store the glass panels. Step 3The framing on our porch was 2x4 and it worked great. The 2x4s gave plenty of space to hold both the screen and window.We also had wood panels to cover the bottom row of frames to use instead of either screens or frames. It offered more privacy and captured more heat in the winter. Step 4Add amenities. Consider installing an exterior fan or perhaps using a portable heater. Either one will help cool or heat the space appropriately.There you have it! Now you are ready for building a three season porch. 
Screened porch windows - DIY Eze Breeze.comElectrical Considerations When Building a Three Season PorchYou may need additional outlets or lights on your 3-season porch because you will quickly use it as a room addition. Plan accordingly. Use our Guide to Porch Electrical Systems to help you assess your electrical needs.Extending current receptacles is a fairly easy DIY project that can be learned easily. Extending "external" receptacles is different than doing it inside your home; there are different code requirements you must meet. For instance, all external circuits must be protected with a GFCI (a Ground Fault Circuit Interrupter). This is the only device that will keep you (or members of your family and friends) from being electrocuted. Check out our Guide to Electrical Codes before you decide to do your own wiring. You may also need to pull a permit to do this - check out our Guide to Building Permits. No short cuts - do it right! If you want to do it yourself and aren't 100% confident in your abilities, contact a local electrician. I've gotten great assistance from them; many are willing to give you advice and/or be your consultant either for free or a small fee. Check around. Your local electrical codes inspector is also a great source for help and guidance.

Hi! We're Mary and Dave, lifelong DIYers, high school sweethearts, and we both love porches. You've come to the right place for thousands of porch ideas. Our Sponsors


End Sponsors Helpful LinksEnjoy shopping Amazon (affiliate link)Popular PagesWhat's NewJoin Our Newsletter Family Porch Designs Porch Ideas for Mobile Homes Build a Porch | Small Porches Porch Columns | Porch Railings Screened Porches Porch Curtains | Porch Enclosures Porch Landscaping | Vinyl Lattice Porch Decorating | Porch Ideas Shop Navigation AidsHome | Top of PageSite Search | Site Map Contact Us PoliciesDisclosure Policy | Privacy PolicyLegal Info Please Join Us Here Also
Find a Trusted Local Pro Copyright© 2008-2025 Front-Porch-Ideas-and-More.com All rights reserved. No content or photos may be reused or reproduced in any way without our express written permission. At no extra cost to you, we earn a commission by referring you to some products on merchant sites. See our disclosure policy. We, Front Porch Ideas and More, confirm, as stated on our privacy policy, that we do not sell personal information. All content here is solely for presenting ideas. We recommend consulting with a licensed, experienced contractor before you begin your project. We make no guarantees of accuracy or completeness of information on our site or any links to other websites contained here. Thank you for taking your time to stop by. See what's popular and new here. |
Hi! We're Mary and Dave, lifelong DIYers, high school sweethearts, and we both love porches. You've come to the right place for thousands of porch ideas. --- Cute Mushroom Mug ---
Wouldn't this be an adorable mug for your porch? It's for sale in my Etsy shop! --- Our Wonderful Sponsors ---
--- End Sponsors ---Our Newsletter, Front Porch AppealLearn more!Thank you for being here! |
|||||
|
At no extra cost to you, we earn a commission by referring you to some products on merchant sites. See our disclosure policy.
We, Front Porch Ideas and More, confirm, as stated on our privacy policy, that we do not sell personal information. All content here is solely for presenting ideas. We recommend consulting with a licensed, experienced contractor before you begin your project. We make no guarantees of accuracy or completeness of information on our site or any links to other websites contained here. Front Porch Home | Return to Top Contact Us | About Us | Advertise with Us | Search | Site Map Media | Privacy Policy | Disclosure | Legal Notice | What's New 
|
||||||
|
No content or photos may be reproduced or copied in any way without our express written permission. | ||||||