Updating Front Porch PostsColonial Wood Porch Posts Get a FaceliftUpdating front porch posts is one way to keep your home fresh and inviting. John and Sherry of Young House Love are passionate about home improvement and generous with sharing their tips.They took on this porch project to inject more of their own personality (clean, straight lines) into the front of their Richmond VA home. The problem was that John and Sherry's porch columns were colonial-style (curvy and scrolly) and they did not match the columns on their car port. Then add to that a scalloped header - definitely not a match for either John or Sherry's tastes. So they put their DIY skills to work to improve their front porch. Let's see how they did it. Giving Front Porch Columns a Facelift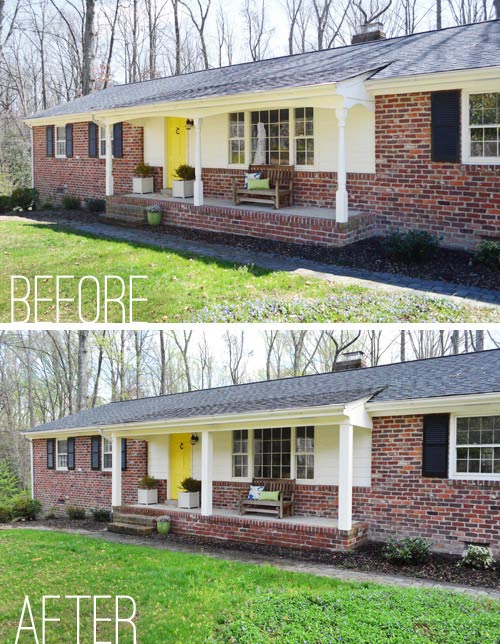
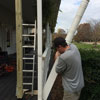
John and Sherry's Front PorchSee the colonial columns and scalloped header on the Before?Now look at the After to see fresh straight lines. Let's see how John and Sherry tackled this project. They are so awesome for sharing their pictures with us so you can learn how they updated their front porch columns. Out Goes the Scalloped and in Comes the StraightFirst, they tackled the scalloped trim / beam. John used a utility knife to score the seams where the scalloped trim met the porch ceiling. He did this to minimize the damages to the many layers of paint.Then he used a rubber mallet and a crow bar to gently loosen the remove the scalloped trim. Once that was off, they replaced the curved trim with new straight trim. They used a 1 x 3" piece of pine wood (already primed) in its place - attached with glue and nails. Later in the project, they decided that the 1 x 3" trim didn't have enough weight to it, so they put up 1 x 6" pine board to give it more depth.
While this project is not difficult, use tools safely and ask for professional assistance if needed.
Updating Front Porch Posts - From Round to SquareThis is where John says "the fun began" - covering the colonial-style wood posts with new wood to give them a boxy, chunky feel.Realize that they could have removed the existing columns and replaced them with brand new square porch columns. But that's a bit more involved and expensive as well. 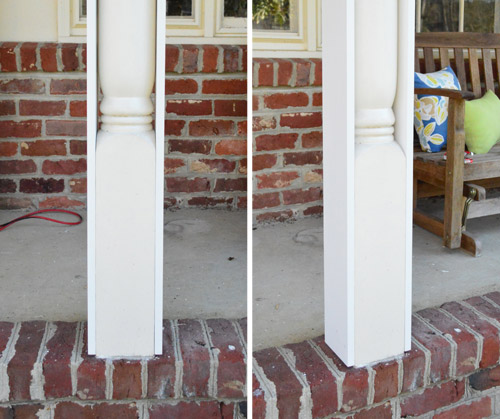
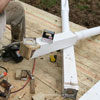
Boxing in the colonial style columnsJohn and Sherry covered their existing posts with 1 x 6's on opposite sides and then 1 x 8's on the remaining two sides (fronts and backs). The only thing they had to trim was the length as their columns were not quite 8 feet tall.They were very fortunate that the 1 x 6's fit just fine! They used strong wood glue and 2" nails at the top and bottom (with a nail gun). Then John added a few screws for extra stability.
Precautionary Note: If your existing wood porch posts are hollow and you plan to box in your front
porch columns in a similar way, Dave and I suggest you add means for good ventiliation.
See our ventilation tips.
Otherwise you risk the chance that they may rot from the inside out.
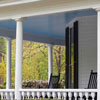
Finishing Touches: Caulking and PaintingThe last step was to caulk and paint. John said that it pays to really caulk the seams well. It might be boring and tiring but it's worth it to seal everything well to prevent moisture from rotting the wood.And of course, it makes your job look much more professional. Important to remember: Use caulk that says it is paintable. The wood that John and Sherry used for this project was already pre-primed so all John and Sherry had to do was to give it a good coat of paint and the job was done. Very nice upgrade indeed: from colonial porch posts to more chunky, square columns plus an updated header / trim piece to give their ranch style home a mini face-lift. 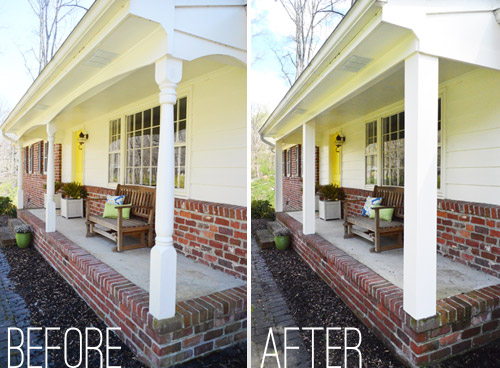
Another before and after to highlight the awesome outcomeMeet John and SherryJohn and Sherry are the husband-wife team who write the wildly popular blog "Young House Love". They share their DIY experiences as well as their fun life with their daughter, Clara, and their dog Burger. Our warm thanks to them!If updating front porch posts is a project you want to tackle, visit John and Sherry's blog to see more details. One stop to their blog and you will probably be addicted like me to their zany stories and practical how-to wisdom. Our warm thanks to John and Sherry for sharing their latest porch project "updating front porch posts" with us.

Hi! We're Mary and Dave, lifelong DIYers, high school sweethearts, and we both love porches. You've come to the right place for thousands of porch ideas. Merchants We Love


Helpful LinksEnjoy shopping Amazon (affiliate link)Popular PagesWhat's NewJoin Our Newsletter Family Porch Designs Porch Ideas for Mobile Homes Build a Porch | Small Porches Porch Columns | Porch Railings Screened Porches Porch Curtains | Porch Enclosures Porch Landscaping | Vinyl Lattice Porch Decorating | Porch Ideas Shop Navigation AidsHome | Top of PageSite Search | Site Map Contact Us PoliciesDisclosure Policy | Privacy PolicyLegal Info Please Join Us Here AlsoCopyright© 2008-2026 Front-Porch-Ideas-and-More.com All rights reserved. No content or photos may be reused or reproduced in any way without our express written permission. At no extra cost to you, we earn a commission by referring you to some products on merchant sites. See our disclosure policy. We, Front Porch Ideas and More, confirm, as stated on our privacy policy, that we do not sell personal information. All content here is solely for presenting ideas. We recommend consulting with a licensed, experienced contractor before you begin your project. We make no guarantees of accuracy or completeness of information on our site or any links to other websites contained here. Thank you for taking your time to stop by. See what's popular and new here. |
--- Our Wonderful Sponsors ---
--- End Sponsors ---Our Newsletter, Front Porch AppealLearn more!Thank you for being here! |
|||||
|
At no extra cost to you, we earn a commission by referring you to some products on merchant sites. See our disclosure policy.
We, Front Porch Ideas and More, confirm, as stated on our privacy policy, that we do not sell personal information. All content here is solely for presenting ideas. We recommend consulting with a licensed, experienced contractor before you begin your project. We make no guarantees of accuracy or completeness of information on our site or any links to other websites contained here. Front Porch Home | Return to Top Contact Us | About Us | Advertise with Us | Search | Site Map Media | Privacy Policy | Disclosure | Legal Notice | What's New 
|
||||||
|
No content or photos may be reproduced or copied in any way without our express written permission. | ||||||