Easy Autumn Pumpkin Fence ProjectA Double-Sided Double-Fun Autumn Craft IdeaMary and I built this autumn pumpkin fence and thought you might like one too. We enjoy easy autumn craft ideas that are fun to make and ones you can use all season!Our double-sided pumpkin fence craft gives you lots of options for placement on your front porch or yard. It can either stand alone or be supported by a porch column or railing. Not only that, you can easily transition the fence to celebrate Halloween, Christmas, or all four seasons too! Autumn is a perfect time to make fall decorations for your front porch and front yard. I intentionally made this so you only have to do straight cuts. With a few basic tools you and your family will be able to quickly make, paint, and assemble our wooden pumpkin fence display to add to your autumn decorating. And it stores easily too. 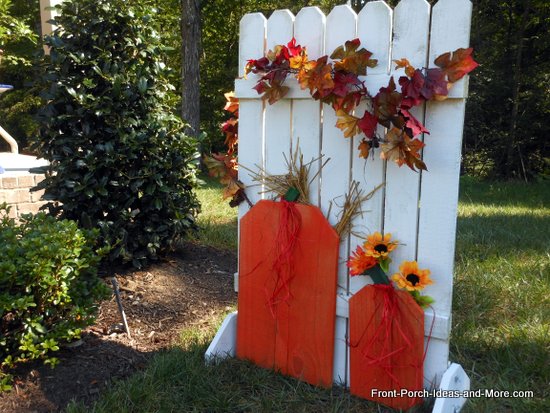

Our autumn pumpkin fence in front yardThe following construction instructions are based on building the autumn pumpkin fence as shown, that is, a double sided outdoor fence and pumpkin decoration at minimal costs. (You can easily use this plan to build a one sided fence decoration too).You can modify this plan to make it any size you need. It is designed to be built with straight cuts for ease of construction and minimal tools. And as an added bonus, it can be stored flat. 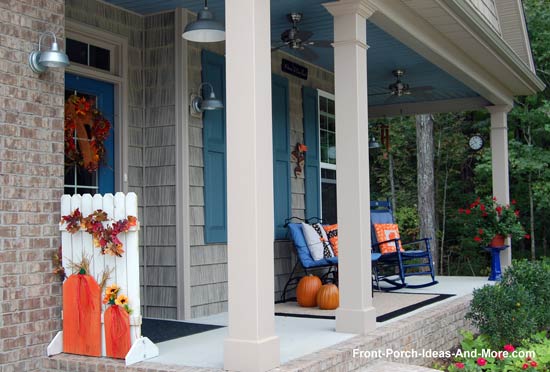
Autumn pumpkin fence on front porchYou can purchase the fence slats at Home Depot, Lowes, or most lumber supply stores. They are relatively inexpensive and treated for outdoor construction projects. Depending on the size of your project you may need to adjust the number of boards.Build Our Easy Pumpkin FenceAs with most projects, please keep in mind it is easier to build something than it is to outline each step which tends to make it look harder than it is. I also used my woodshop tools; however, this project can be made just as easily with hand tools.Overall MeasurementsFence: 26 inches by 42 inchesPumpkin: 2 @ 13 x 21 inches Pumpkin: 2 @ 8 x 13 inches Stands: 2 @ 6 x 12 inches Materials List- 7 Boards: 3 1/2 inches x 42 inches (I purchased six 10 foot long dog-eared fence slats (approx $2.45 each) and cut them to size. By doing so I had enough boards left to make the pumpkins. However, you could choose other style pickets already the length you'd like and use scraps for the pumpkins)- 4 Boards (rails): 2 inches x 26 inches (If making a one-sided decoration cut only 2 boards) - 1 3/4 inch galvanized deck screws (or nails) - 1 inch galvanized deck screws (or nails) - Wood Glue (exterior wood glue preferred) Paints- Orange paint (we used orange spray paint)- White paint (we used ceiling paint we already had on hand) - Green paint (could use craft paint as you only need a little) - Paint brush Tools- Tape Measure- Saw (table saw is you have one or access to one) - Screw Driver (or drill and driver bit) - Drill and pilot bit (drill pilot holes to prevent splitting the wood if using screws) - Square (optional)
NOTE: If you don't have access to a table saw (or have a neighbor that has one), you can find
various style and sized pickets at Home Depot or Lowes that will work saving you from doing Steps 1-3.
Step 1: Cut boards at 42 inches. You will need seven (7) boards and should be able to get two 42 inch boards from each slat. Save the remnants. Step 2: Rip the boards to 3 1/2 inches wide. 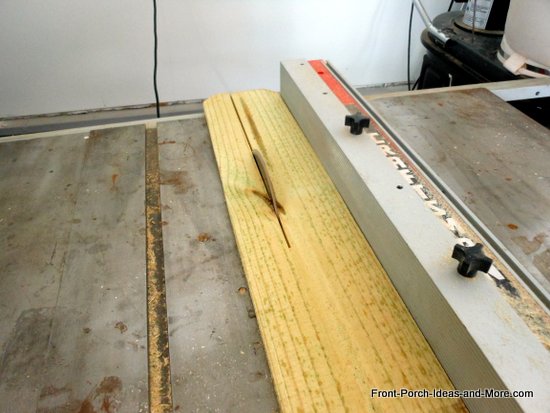
Ripping boards to 3 1/2 inchesStep 2A: Cut dog-ears on one end of each board. Dog ears as shown were cut by measuring 1 inch across and 1 inch down on one end of each board.Draw a diagonal line and cut accordingly. Repeat on each of the 7 boards. 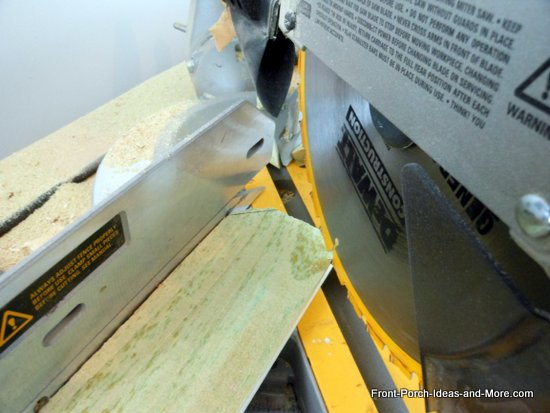
Marked board for cutting dog-earsStep 3: Cut four (4) rails from remnants to 26 inches long (two if making a one-sided fence decoration)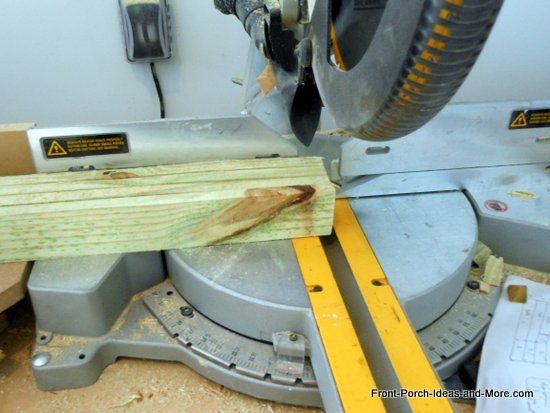
Cutting the rails to 26 inchesStep 4: Lay the boards on the floor or work table as shown.Place the top rail 7 ½ inches from the top of the boards. Draw a line across the boards. Place the bottom rail 31 inches from the top. Draw a line across the boards. 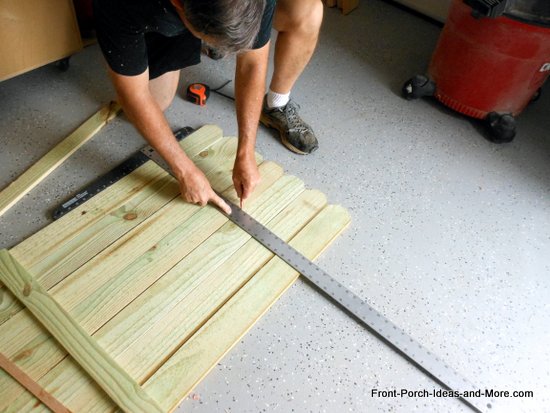
Marking a line 7 1/2 inches from topStep 5: Align the two top rails. To do so, slide the inside slats out of the way and use a square to ensure they are aligned (or align by measuring).Secure the rails to the end slats with screws or nails. 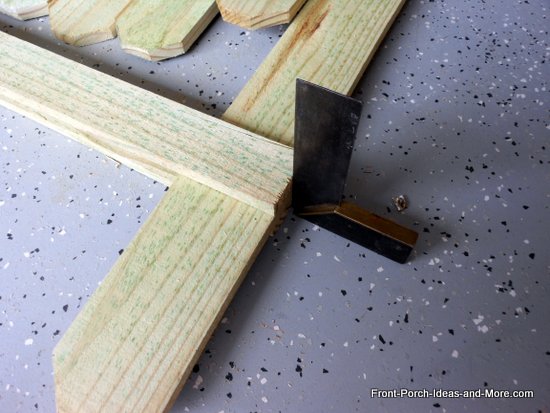
Aligning and squaring top railsStep 6: Repeat step 5 with the bottom rails.Step 7: Slide the remaining boards into place ensuring they are level at the top and your previous mark aligns along all boards. Use a ¼ inch spacer between the boards to create the right spacing. Secure both top and bottom rails to boards with screws or nails. 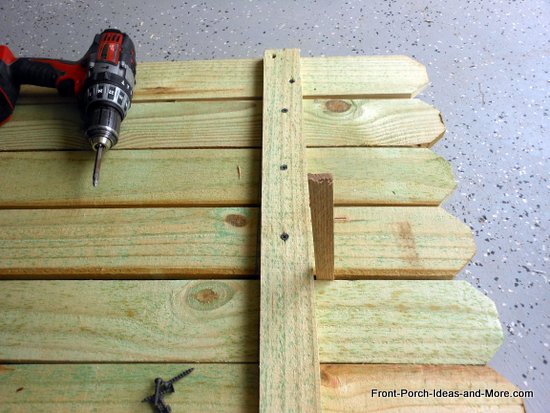
Securing top rails to fence slatsView of completed fence: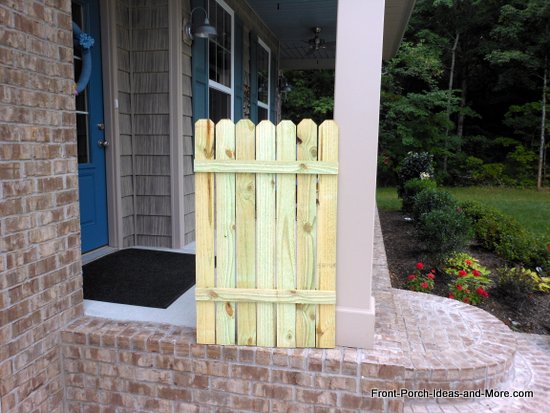
Your fence should look something like this.Step 8: Make four (4) pumpkins for a double-sided fence or two (2) for a one-sided fence decoration. Use the remaining remnants and to make the pumpkins. (You can also use these pumpkin craft ideas for other autumn decorating projects as well). The two large pumpkins (one for each side of the fence) are 13 by 21 inches. The small pumpkins (one for each side of the fence) are 8 by 13 inches. Cut dog ears on the outer slats (3 inches across and 3 inches down - draw diagonal line and cut accordingly). Secure with screws or nails. 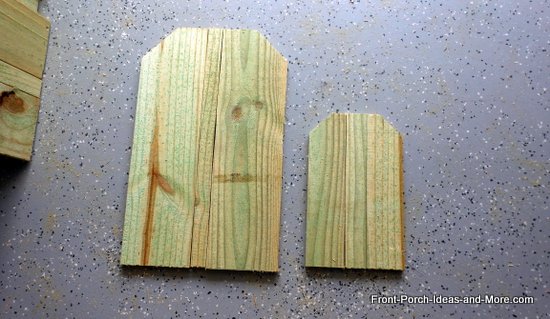
Pumpkins cut from wood remnants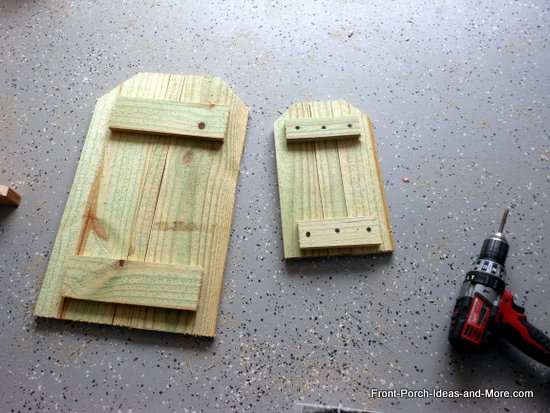
Rails attached to backs of pumpkinsStep 9: Cut the pumpkin stems. Cut four pieces of remnants to approximately 1 ½ by 2 ½ inches.Cut a diagonal on one end of each piece. 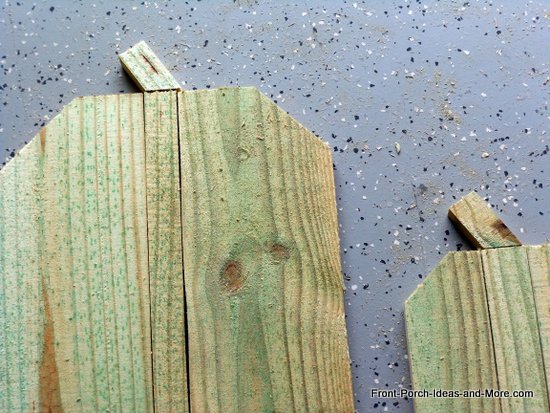
Pumpkin stemsStep 10: Paint the fence white (or color of your choice).Paint the pumpkins orange. Paint the stems green. After the paint dries, glue the stems to the pumpkins. 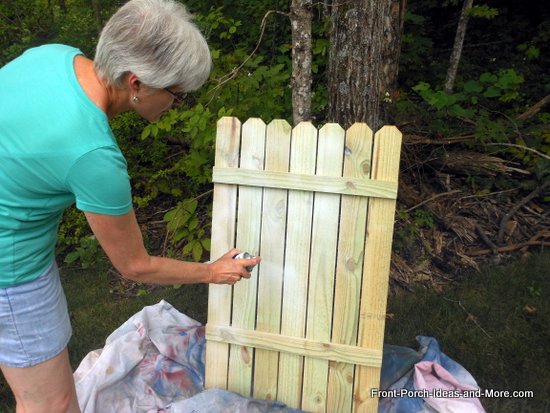
White-washing the fence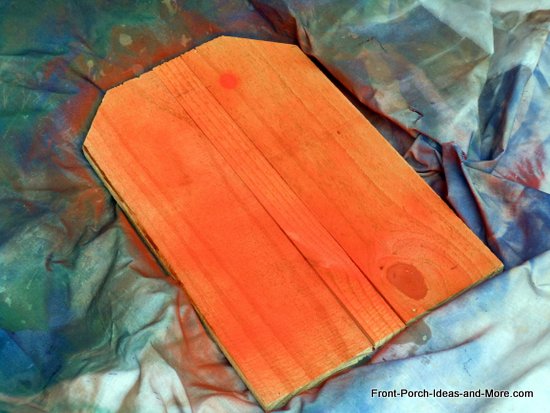
Pumpkins painted orangeStep 11: Cut supports. If making a standalone fence, cut braces as shown. Mine are 6 x 12 inches.If using as a yard decoration, cut stakes and attach to sides. 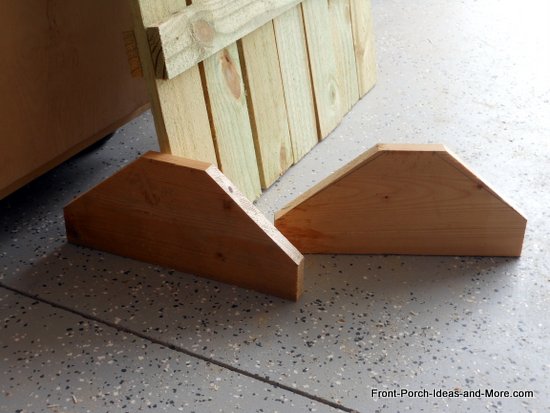
Braces for standalone fenceAttach the braces to the fence with screws or nails. Before you do that consider another neat option that will make it easier for you to store the decoration. Use T-Nuts for This Autumn Pumpkin Fence Project!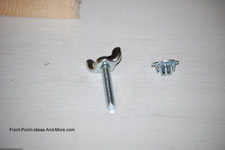 First, purchase four t-nuts and four wing bolts from Home Depot, Lowes, or other home improvement store. I used 1/4 inch t-nuts and wing bolts.
Make sure the wing bolts are long enough to extend through your brace and into the t-nut.
First, purchase four t-nuts and four wing bolts from Home Depot, Lowes, or other home improvement store. I used 1/4 inch t-nuts and wing bolts.
Make sure the wing bolts are long enough to extend through your brace and into the t-nut.
I made my braces from 3/4 inch thick wood and purchased 1 & 1/4 inch long wing bolts. Second, mark and drill 1/4 inch holes through the brace and into the side of the fence. Make sure the hole is deep enough to accept the wing bolt (the hole should be longer than the t-nut). 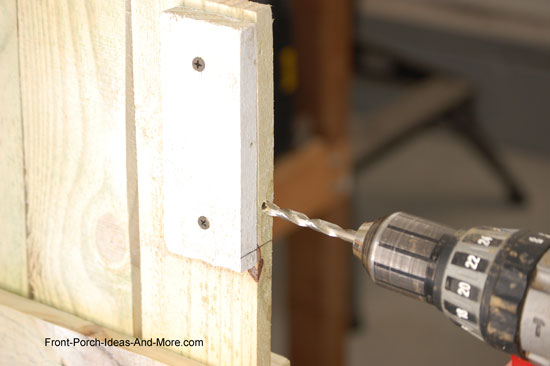
Insert the t-nut into the fence's hole. You will have to use a hammer to secure the t-nut to the wood. 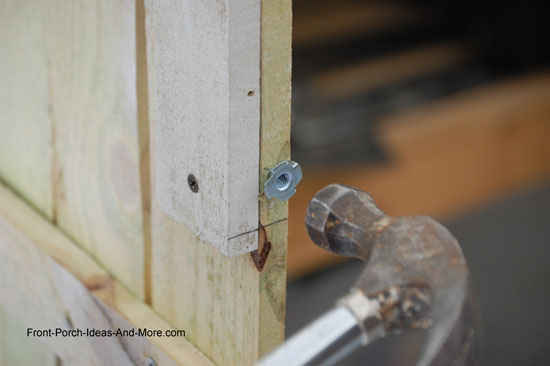
Third, attach the brace to the t-nut by inserting the wing bolt through the brace and into the t-nut. Repeat with second t-nut and wing bolt in the same brace. Repeat process with other brace. 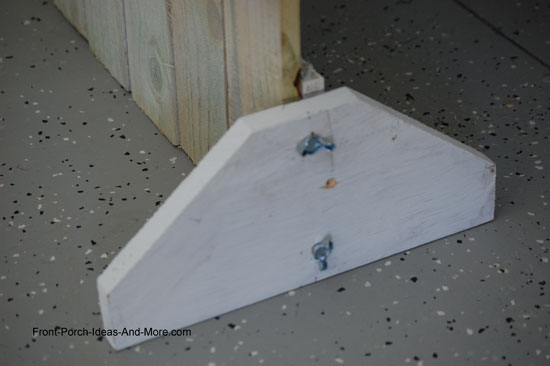
For disassembly, just remove the wing bolts. Step 12: Assemble the unit. Attach the pumpkins to the fence with nails or screws. Or, use t-nuts and wing bolts described above making it quick and easy. 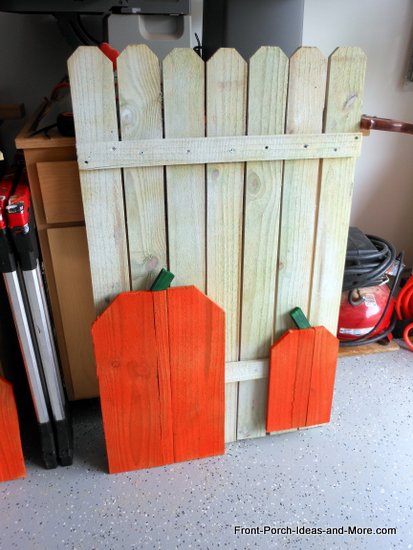
Step 13: Embellish Your Autumn Pumpkin Fence: Use autumn leaf garland or hang an autumn wreath to accentuate the decoration. 
Decorated wooden pumpkin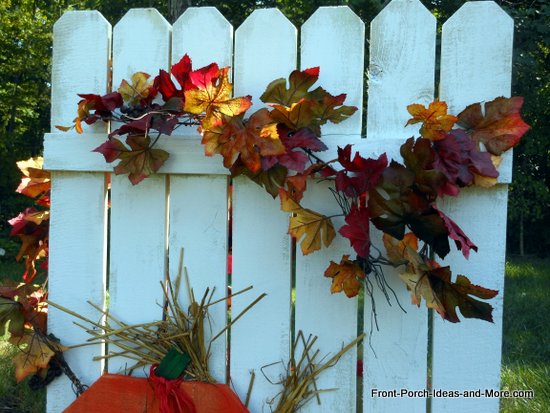
Autumn leaf garland draped over fenceStorageThe autumn pumpkin fence is so easy to store. Just remove the pumpkins and stand (or stakes) and place between the fence rails. Secure with a bungee, string, or rope.Transition Your Autumn Pumpkin Fence to HalloweenTurn our autumn decorating into a Halloween decoration.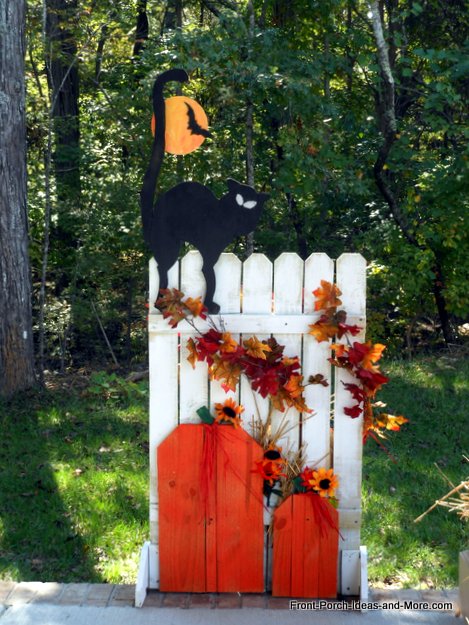
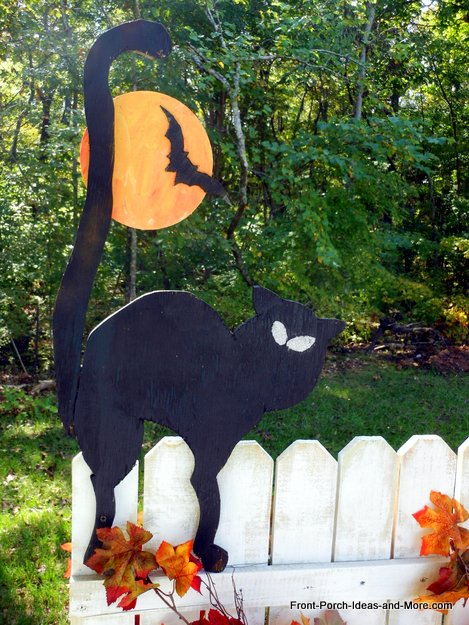
Use our black cat and/or bat templates ( access them here for free) along with our instructions to make these Halloween characters. You could also separately attach bat(s) to dowels and insert them into holes you drill into the top rail of the fence. Christmas Decorating Ideas For Your FenceRemove the pumpkins and hang Christmas lights, holiday wreaths, or use the same methods described above to create colorful packages to place in front of the fence. Or, make a Christmas tree like you made the pumpkins and affix to the fence. Finish it with Christmas lights.Spring/Easter/SummerMake bunnies, birds, watering cans, flowers, etc., from the slats as you did the pumpkins and hang on the fence.Send us pictures of your autumn pumpkin fence to share with others. And if you have other autumn craft ideas be sure to send them along - we'd love to see them! 
Fun autumn decoration for porch or yard

Hi! We're Mary and Dave, lifelong DIYers, high school sweethearts, and we both love porches. You've come to the right place for thousands of porch ideas. Our Sponsors


End Sponsors Helpful LinksEnjoy shopping Amazon (affiliate link)Popular PagesWhat's NewJoin Our Newsletter Family Porch Designs Porch Ideas for Mobile Homes Find a Local Contractor Build a Porch | Small Porches Porch Columns | Porch Railings Screened Porches Porch Curtains | Porch Enclosures Porch Landscaping | Vinyl Lattice Porch Decorating | Porch Ideas Shop Navigation AidsHome | Top of PageSite Search | Site Map Contact Us PoliciesDisclosure Policy | Privacy PolicyLegal Info Please Join Us Here Also
Find a Trusted Local Pro Copyright© 2008-2024 Front-Porch-Ideas-and-More.com All rights reserved. No content or photos may be reused or reproduced in any way without our express written permission. At no extra cost to you, we earn a commission by referring you to some products on merchant sites. See our disclosure policy. We, Front Porch Ideas and More, confirm, as stated on our privacy policy, that we do not sell personal information. All content here is solely for presenting ideas. We recommend consulting with a licensed, experienced contractor before you begin your project. We make no guarantees of accuracy or completeness of information on our site or any links to other websites contained here. Thank you for taking your time to stop by. See what's popular and new here. |
Hi! We're Mary and Dave, lifelong DIYers, high school sweethearts, and we both love porches. You've come to the right place for thousands of porch ideas. --- Our Sponsors ---
--- End Sponsors ---Find Top-Rated Service Pros
Our Newsletter, Front Porch AppealLearn more!Thank you for being here! |
|||
|
At no extra cost to you, we earn a commission by referring you to some products on merchant sites. See our disclosure policy.
We, Front Porch Ideas and More, confirm, as stated on our privacy policy, that we do not sell personal information. All content here is solely for presenting ideas. We recommend consulting with a licensed, experienced contractor before you begin your project. We make no guarantees of accuracy or completeness of information on our site or any links to other websites contained here. Front Porch Home | Return to Top Contact Us | About Us | Advertise with Us | Search | Site Map Media | Privacy Policy | Disclosure | Legal Notice | What's New 
|
||||
|
No content or photos may be reproduced or copied in any way without our express written permission. | ||||